Almost every FDM print failure traces back to one of six causes: poor bed adhesion, the wrong temperature, wet filament, a nozzle clog, a mechanical motion fault, or a slicer profile that doesn’t match the material. A good 3D print failure diagnosis tool does one thing well — it maps the symptom you can see to the cause you can’t, so you change one variable instead of a dozen. That distinction is the whole game. Warping and layer shifting can look superficially similar on a plate; a partial clog and heat creep produce near-identical extrusion. Fix the wrong one and you waste more filament, not less.
This is a practical, symptom-by-symptom guide to diagnosing the most common FDM failures correctly the first time — with the mechanisms, the numbers, and the edge cases a competent maker actually asks about. Where a photo would settle it faster, the Diagnose tool identifies defects from an image and returns concrete slicer changes rather than a generic checklist.
The diagnostic method: change one variable at a time
Before any advanced tuning, the workflow is boring and it works:
- Return to a known-good profile. If a print used to succeed and now doesn’t, revert first. This isolates whether the fault is the printer or the profile.
- Inspect mechanically. Belts, pulley grub screws, nozzle, build plate. Two minutes here saves an hour of setting changes.
- Rule out wet filament. Dry or swap the spool before you touch temperature or retraction.
- Change one variable, then print a small test. A 20 mm test tells you if the fix worked before a 9-hour job commits the material.
Run the pre-flight sanity check first: the build plate is clean and free of finger oil, dust and old adhesive; the nozzle is clean outside and isn’t dragging through the first layer; the filament is dry and feeds without spool resistance; the bed is level or the mesh is current. If those four are wrong, no slicer setting will save you. Our G-code pre-flight checklist and the pre-flight check tool automate the parts you’d otherwise forget.
Symptom map: tie each defect to a likely cause
 1%).” width=”1127″ height=”636″ style=”max-width:100%;height:auto;”/>
FDM problems are easier to solve when each symptom is bound to a probable cause. A failed first layer, stringing, warping, weak walls, layer shifts, blobs and clogs do not share a single root setting — so changing everything at once turns diagnosis into guesswork.
| Symptom | Most likely cause | First thing to change |
|---|---|---|
| First layer won’t stick / lines look round and separate | Z-offset too high, dirty plate, low bed temp | Clean plate, re-check Z with paper test |
| Bulge at the base (elephant’s foot) | Over-squish (Z too low) or bed too hot | Raise Z slightly, add elephant’s-foot compensation |
| Corners lift a few layers in | Shrinkage stress > adhesion (warping) | Brim, higher bed temp, reduce cooling |
| Fine hairs between parts | Stringing — hot/under-retracted | Lower temp 5–10°C, tune retraction |
| Gaps, missing lines, thin walls | Under-extrusion or partial clog | Extrusion test, check flow & E-steps |
| Sudden sideways jump in the print | Layer shift — mechanical/electrical | Note axis, tighten pulley grub screw |
| Splits along layer lines | Delamination — too cool/fast/wet | Raise temp, slow down, dry filament |
First layer and bed adhesion
The first layer is the foundation for everything; if it fails, the whole print fails, and it’s the single most common category of problem. Weak first layers come from an incorrect Z offset, an unclean surface, low bed temperature, excessive first-layer speed, or a part with too little contact area.
Use the paper test: a sheet should drag slightly between nozzle and bed at all four corners and the centre. Klipper users should run BED_MESH_CALIBRATE and check the variance — an uneven bed, even by a few degrees, gives inconsistent adhesion across the first layers.
Two directional errors get confused. Lines that look round and separate sit too high. A base that bulges outward — elephant’s foot — is usually too low (over-squished) or the bed is running too hot. Both are Z-offset faults; they just point opposite ways.
Warping: shrinkage stress, not weak glue
Warping is a stress problem, not simply an adhesion problem. Internal stress doesn’t distribute evenly across a flat surface: the centre is constrained by surrounding material while the corners have less restraint, so upward force concentrates there — which is exactly why box shapes curl at the corners first.
The tell for diagnosis: if a print adhered well and then lifts at the corners a few layers in, that’s not weak adhesion — it’s accumulated shrinkage stress finally exceeding the adhesion force. The fix isn’t more glue stick; it’s less stress (warm chamber, controlled cooling) plus more grip (brim, hotter bed).
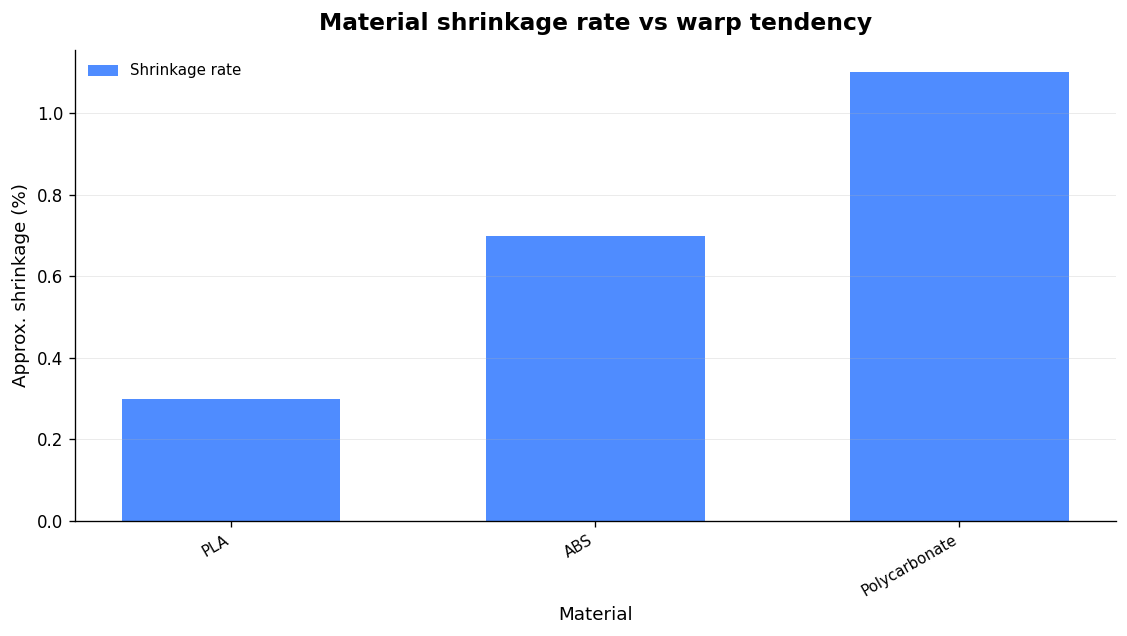
Material choice sets the difficulty. Shrinkage rates drive warp tendency directly:
| Material | Approx. shrinkage | Warp tendency |
|---|---|---|
| PLA | Low | Mild — forgiving |
| ABS | ~0.7% | High |
| Polycarbonate | >1% | Very high |
Work the causes in order — bed cleaning, first-layer tuning, bed temperature, cooling, then brims — and you’ll narrow down most warping without random experimentation. If you routinely print ABS, ASA or PC, predicting where distortion will occur before you print is more useful than reacting after: ATN Slicer’s Workshop physics suite forecasts warp and rewrites the plate to reduce it, and its thermal simulation flags heat build-up in an enclosure before it becomes heat creep.
Stringing and oozing
Stringing (webbing, oozing) leaves thin strands between parts. It comes from a nozzle that’s too hot (more fluid filament drips more), retraction that’s too short or too slow, inadequate cooling, or excessive travel speed.
Sensible starting points — treat as ranges, not gospel:
- Retraction distance: 4–6 mm for Bowden, 2–4 mm for direct-drive.
- Retraction speed: 25–45 mm/s — fast enough to pull back, slow enough to avoid grinding the filament.
- Temperature: drop 5–10°C in increments while watching flow.
- Z-hop on retraction to lift the nozzle over travels.
PETG strings more than PLA by nature — expect some hairs and clean them off with a heat gun or a quick pass of a lighter after the print. Don’t chase zero stringing on PETG by starving retraction; you’ll trade it for clogs.
Under-extrusion vs partial clog
Gaps, missing lines and weak walls point to under-extrusion — but the root could be flow rate, a partial clog, feeder slip, wet filament, or wrong E-steps. Incorrect E-steps skew dimensional accuracy and layer adhesion, so verify them when you change filament brand, nozzle size or extruder type, and as routine maintenance. Small calibration drift compounds over many layers, so it’s worth doing properly rather than eyeballing.
Layer shifting: find the axis first
A layer shift is a sudden sideways jump — distinct from warping (corners lift) and under-extrusion (gaps). Diagnose by direction: a left/right shift is the X axis, a front/back shift is Y. That tells you which belt, pulley and motor to inspect.
- Loose pulley grub screw is a top cause. Find the set screw on each motor pulley, tighten it with the correct hex key, and make sure it presses on the flat of the shaft — don’t skip this even if the belts feel fine.
- Belt tension: press with a finger. Firm, not floppy, not guitar-string tight.
- Speed/acceleration/jerk: aggressive defaults overwork motors and lose steps — lower them in the slicer.
- Electrical: under-powered or badly calibrated stepper drivers lose steps, giving shifts, cracks and poor quality.
Delamination and weak parts
Temperature is the single most influential variable in layer adhesion. Mid-print separation is almost always printing too fast, too cool, or both. A clean PEI spring steel plate, correct Z-offset and dry filament resolve most adhesion problems; parts that fail along layer lines usually come from low nozzle temperature, poor orientation, too much fan, under-extrusion, wet filament, or the wrong material for the job.
PETG is the awkward middle ground: too much cooling delaminates, too little strings. Start at 30–40% fan on PETG and adjust — don’t copy a PLA fan profile onto it.
Clog or heat creep? Diagnose before you dismantle
This is where a diagnosis tool earns its keep, because the fixes differ completely. There are three distinct faults:
- Partial clog: plastic flows but starved — gaps, thin walls. Residue narrows the bore or carbonised debris partially blocks the exit.
- Full clog: nothing flows even when pushed by hand.
- Heat creep: filament softens in the heat break above the melt zone and jams there. Symptoms look identical to a clog, but the blockage is in a different place — and cold-pulling won’t touch it.
Run the test before taking anything apart. Heat to printing temperature and command a manual 50 mm extrude. Watch: a partial clog extrudes filament that curls straight back toward the nozzle rather than dropping, and the strand is thinner than the nozzle diameter.
Heat creep is heat from the block travelling up the heat break into the cold end, where the filament should stay solid — it softens, expands and plugs the path. Typical triggers: a failed heat-break fan, over-aggressive retraction on flexibles, or a low-temperature material sitting in a hot enclosure (PLA in a closed P1S is the classic). A cold/atomic pull clears many partial clogs and costs nothing, but it does nothing for heat creep and nothing for a dead cooling fan — which is exactly why diagnosing first matters.
Where a tool beats a checklist
A checklist assumes you already know which failure you’re looking at. Often you don’t — the same photo can read as under-extrusion or a partial clog until you run the extrusion test. That’s the case for an actual diagnosis workflow: our AI failure-diagnosis approach and the defect identification tool narrow the cause from the visible symptom, and the Ask advisor handles the follow-up questions. For the underlying root causes across categories, see what actually causes print failure.
FAQ
How do I tell warping from layer shifting?
Look at the geometry. Warping lifts corners and edges off the bed while the print otherwise stays aligned. A layer shift is a clean sideways jump partway up — the layers above are offset from the ones below. Warping is a thermal/stress issue; shifting is mechanical or electrical.
Why does a cold pull sometimes not fix a clog?
Because the blockage isn’t in the nozzle. Cold pulls clear residue and small carbonised debris from the melt zone, but heat creep jams the filament in the heat break above it. If a cold pull keeps failing, check the heat-break fan and your enclosure temperature for the material you’re running.
Do I really need to recalibrate E-steps that often?
Recalibrate when you change filament brand, nozzle size or extruder type, and periodically as maintenance. Drift is small per layer but cumulative, and it quietly degrades dimensional accuracy and layer adhesion on functional parts.
What fan speed should I use for PETG?
Start around 30–40% and adjust. Too much cooling delaminates PETG; too little leaves stringing. Don’t reuse a PLA fan profile — PETG needs less cooling than PLA to bond properly.
Related: How to Diagnose a 3D Print Failure From a Photo: A Practitioner’s Decision Tree