Before you touch a single slider, get the order right: mechanically level the bed, set the Z-offset on the printer, let auto-levelling or an adaptive bed mesh fine-tune, and only then adjust the first layer calibration settings in OrcaSlicer. Height, line width, speed, temperature and flow all assume the nozzle-to-bed gap is already correct. If it isn’t, you’ll spend an afternoon chasing a symptom by nudging the wrong number. This article gives you the real values, the mechanism behind each one, and where they actually live in the current OrcaSlicer UI — with the version caveats flagged, because a couple of these have moved.
Start with Z-offset — it owns the first layer
Z-offset defines the precise distance between nozzle and bed for the first layer, and it is the single biggest lever on adhesion. Too high and the filament lays down as a wire that won’t bond; too low and you get bed scraping, elephant’s foot, or extruder clicking as the melt has nowhere to go.
On most setups there are three places this value lives, and confusing them is the classic mistake:
- The printer’s firmware — its own levelling or probe offset. This is where your baseline belongs.
- OrcaSlicer’s Z-offset field — under Printer presets > General in recent builds. Use it only for minor tweaks if your printer supports a slicer-defined offset. Always calibrate on the printer first.
- A live trim — babystepping / “Z Adjust” while the first layer prints.
A quick note on where this sits in the UI: historically Z-offset was not exposed per-filament and users edited start G-code by hand. A later beta of OrcaSlicer exposes a Z-offset in the machine configuration, and there are open feature requests for a filament-level override. So confirm your installed build — the exact location is version-dependent.
Sign convention: positive = nozzle up (less squish), negative = nozzle down (more squish). Get this the right way round before you start nudging.
Live-tuning workflow: if the first layer looks too high, lower the nozzle in 0.01–0.02 mm steps with babystepping until it reads as a flat ribbon rather than a wire or a blob. Then add that delta to your stored Z-offset and save the profile so you don’t repeat the exercise next print.
Speed does not correct a wrong gap. If the layer is inconsistent, re-check the offset first. For a structured walkthrough of what a good — and bad — first layer looks like, our diagnose a failed print from a photo tool will name the defect and hand you the slicer change.
First layer height: 0.25 mm for a 0.4 mm nozzle
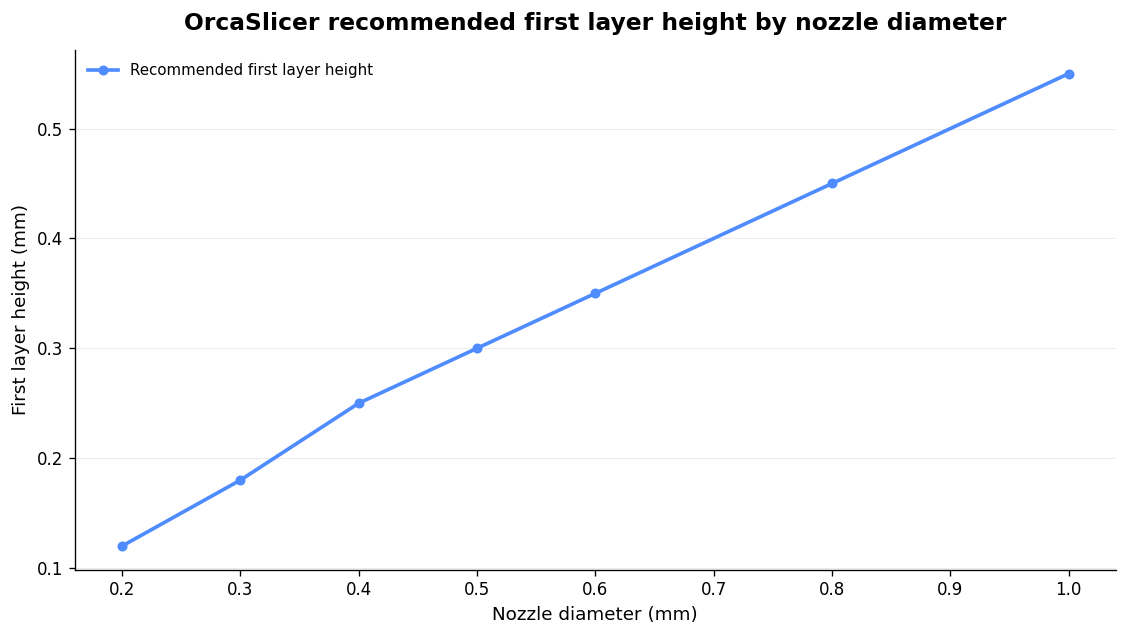
The parameter is initial_layer_print_height. A thicker first layer gives you more melted plastic to bond and bridges small imperfections in the build surface. The OrcaSlicer wiki quick-reference ties first layer height to nozzle diameter:
| Nozzle (mm) | Recommended first layer height (mm) | % of nozzle |
|---|---|---|
| 0.2 | 0.12 | 60% |
| 0.3 | 0.18 | 60% |
| 0.4 | 0.25 | 62.5% |
| 0.5 | 0.30 | 60% |
| 0.6 | 0.35 | 58% |
| 0.8 | 0.45 | 56% |
| 1.0 | 0.55 | 55% |
For adhesion, stay in the 0.2–0.28 mm band on a 0.4 mm nozzle. 0.24 mm is a common alternative — it lays a slightly thicker first extrusion that tolerates small bed-level variation. Going below 0.2 mm makes adhesion fussier, not better, and there’s a hard limit worth knowing: the first layer width can’t be smaller than the first layer height, so very thin first layers will always show print lines.
Default caveat: some third-party guides state the shipped default is 0.2 mm regardless of layer height, while the OrcaSlicer wiki lists 0.25 mm for a 0.4 mm nozzle. A few versions back the standard setting was changed to 0.20 for all first layer heights. Treat the exact default as version-dependent and check yours.
First layer line width: 100–120%
Set this under Quality > Line width > Initial layer (CLI: --initial-layer-line-width). OrcaSlicer calculates extruded volume from line width and layer height, so 100% gives a line as wide as the nozzle and higher values squish it wider than the nozzle opening — more material down, a bigger contact patch with the bed. On a 0.4 mm nozzle that’s roughly 0.45–0.5 mm in absolute terms. This value also overrides the brim’s and skirt’s line width.
For adhesion, 100–120% is the working range; stubborn plates sometimes want 120–150% temporarily. But there’s a real conflict worth flagging if you care about a smooth, artefact-free bottom surface: one user found artefacts only disappeared at a first-layer width around 0.26 mm, and that above roughly 0.3 mm the artefact vanishes but print lines become visible. That’s finish-focused advice pulling the opposite way to adhesion-focused advice. Pick your priority — you usually can’t maximise both on the same layer.
First layer speed: 20 mm/s, always
Set this under Speed > Initial layer speed. Fast first layers are a leading cause of poor adhesion, especially on bigger plates where the bed mesh has more to compensate for. A safe starting point is 20 mm/s for the main first layer and around 15 mm/s for first-layer infill. Going slower only helps if the layer is inconsistent — and even then, re-check the offset, because speed can’t fix a wrong gap.
First layer temperature: +5 °C over your normal value
Two parameters matter: first_layer_temperature (nozzle) and first_layer_bed_temperature (bed). Set the first-layer nozzle temperature around +5 °C over your normal value, under Filament > Initial layer printing temperature. A hotter first layer flows into the bed texture better. Typical pairings:
| Material | First-layer nozzle (°C) | Bed (°C) | First-layer notes |
|---|---|---|---|
| PLA | 215 | 60 | 0.25 mm height, 110% width, 20 mm/s. Fan off for layer 1 aids PEI adhesion. |
| PETG | 240 | 80 | Slightly higher Z-offset so it doesn’t weld to PEI; glue as release on textured sheets. 0.25–0.30 mm first layer. |
| ABS/ASA | — | 95–110 | Enclosure or draft shield, ~5 mm brim, slow first layer. |
| TPU | — | 40–50 | Slow first layer (15–20 mm/s), modest flow. |
Cooling is part of first-layer adhesion for warm-loving materials. PETG and ABS/ASA profiles should disable cooling for the first 4–6 layers — OrcaSlicer’s Generic PETG profile already uses reduced fan on the first few layers for exactly this reason. For the full material-specific breakdowns, see our guides on first layer settings in OrcaSlicer and PETG first layers without welding to your sheet.
First layer flow ratio: leave it at 100% first
Don’t reach for flow before height and width. The default advice is to stay at 100% (1.0). Only if the first layer looks slightly starved — visible gaps after you’ve dialled in height and width — nudge it +2–5% under Quality > Advanced > Flow ratio. Over-extruding the first layer creates elephant’s foot and ridges, so this is a small, last-resort adjustment.
There’s a known conflict here: some adhesion-troubleshooting guides suggest dropping speed to 20 mm/s and raising initial layer flow ratio to 1.05, while others say leave it at 100%. Both can be right — it’s situational. For the opposite problem (over-squish and elephant’s foot), flow goes the other way: reduce it to 0.9–0.95 under Filament Settings > Advanced.
Elephant foot compensation (Quality > Precision)
OrcaSlicer lets you specify a positive distance by which the first layer is shrunk, decreasing linearly over a set number of layers. With Elephant Foot Compensation Layers = 1, the first layer gets full compensation and the second onward gets none; higher layer counts taper the correction over more layers. Elephant Foot Compensation Density controls the internal solid infill density on those compensation layers, and a “Brim use EFC outline” option keeps the brim attached when you’re running a high value.
Starting values: 0.1–0.2 mm (begin at 0.1 mm, increase only if it persists), with first-layer flow at 95–100% — above 105% the elephant’s foot gets worse, not better.
Sign-convention warning: an older 2.0/2.1-dev issue reported that setting elephant foot compensation made the first layer wider rather than thinner (closed as not planned). Some third-party pages describe it as a negative value, which conflicts with the official wiki’s “positive distance”. Verify the direction in your installed version with a quick test cube before trusting it on a real part.
Framing matters here: elephant’s foot rarely has a single cause. It’s usually a combination of Z-offset, bed temperature and cooling that together decide how long the first layer stays soft. Compensation is a correction, not a cure for a too-low nozzle.
The calibration method: change one variable at a time
The quickest way to waste a roll is to move several numbers at once. Leave first layer height and line width at the shipped value while you calibrate the offset — an unusually thick or thin first layer hides a wrong offset, and if you change width and offset together you can’t tell which one fixed the layer. Keep one baseline Z-offset per machine and plate; if a layer is right with one filament and wrong with another, adjust the material’s first-layer settings rather than the machine offset.
Run your sliced file through the G-code pre-flight checklist before you commit a long print — it catches the first-layer mistakes (wrong offset start G-code, a fan that’s on when it shouldn’t be, a first-layer speed that crept up) that only show up once the nozzle’s moving. The same 40+ rule engine is built into ATN Slicer, our Windows fork of OrcaSlicer, so the check runs as you slice.
Running more than one printer?
Once you’re printing to sell — Etsy, eBay, a props shop, a prototyping bureau — first-layer failures stop being an annoyance and start being lost margin. Printer Farm runs the whole job end to end: a web order from WooCommerce, Shopify or your own custom website (connected through the farm’s shop API, a token, no plugin) comes in, stock is used first, one click raises a works order for exactly the shortfall, the queue dispatches each job to the first free compatible printer with the right filament loaded, and camera-based AI failure detection watches the plate and alerts you. Good prints bank into stock with a true cost per part, and despatch raises a numbered delivery note. It needs a small agent on a Windows or Linux computer that stays on; files stay on your own machine and slicing runs on your PC through ATN Slicer. It works with Creality and any Klipper/Moonraker printer, Bambu Lab in LAN mode, FlashForge, OctoPrint, PrusaLink and Duet. There’s a free 14-day Workshop trial, no card. If you’re weighing options, our fleet management software guide sets out what to look for.
FAQ
What is the correct first layer height in OrcaSlicer for a 0.4 mm nozzle?
0.25 mm — about 62.5% of nozzle diameter per the OrcaSlicer wiki. The practical adhesion band is 0.2–0.28 mm; 0.24 mm is a popular alternative that tolerates small bed-level variation. Below 0.2 mm, adhesion gets fussier, not better.
Which way does OrcaSlicer’s Z-offset go?
Positive moves the nozzle up (less squish); negative moves it down (more squish). Calibrate the baseline on your printer’s firmware first, then use OrcaSlicer’s Z-offset field (Printer presets > General, in recent builds) only for minor tweaks if your printer supports a slicer-defined offset.
Should I increase first layer flow to fix adhesion?
Not first. Leave flow at 100% and fix height, line width, Z-offset, speed and temperature. Only nudge flow +2–5% if the layer still looks starved afterwards — over-extruding the first layer causes elephant’s foot and ridges.
Is elephant foot compensation a positive or negative value?
The official wiki describes it as a positive distance by which the first layer is shrunk, but some third-party pages and an older dev-branch bug describe it differently. Verify the direction with a test cube in your installed version before relying on it, and start at 0.1 mm.
Related: PETG First Layer Settings in OrcaSlicer: The Exact Values That Make It Stick (and Release Cleanly)