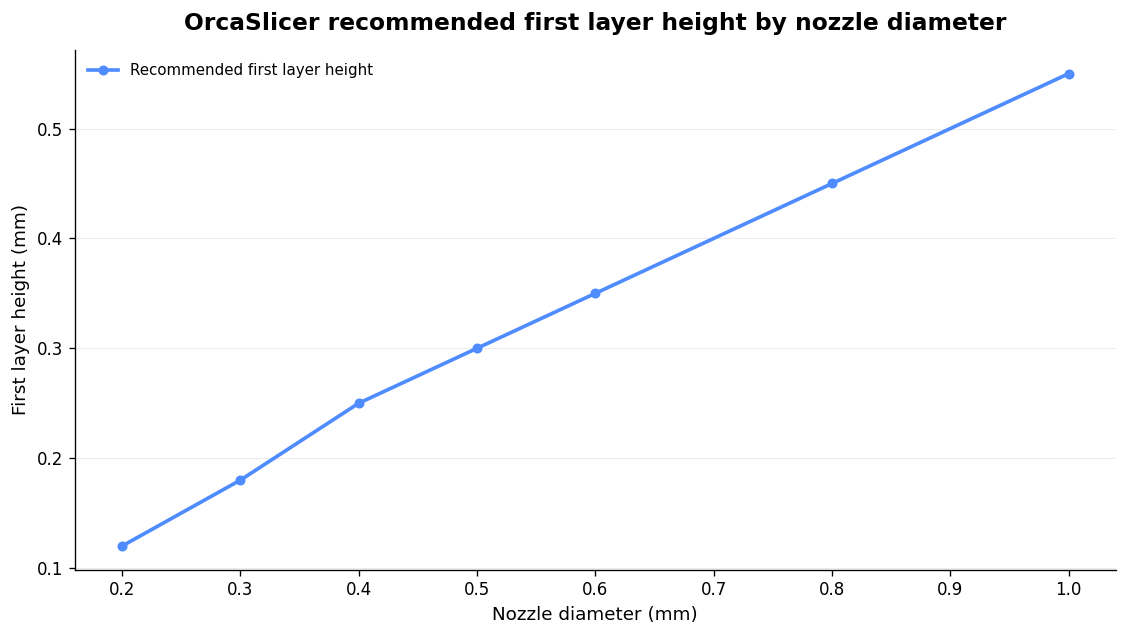
For PETG in OrcaSlicer, a reliable starting point is a 240 °C first-layer nozzle, a 70–80 °C bed, a 0.25–0.30 mm first-layer height, line width at 110–120% of nozzle diameter, 20–30 mm/s first-layer speed and the part-cooling fan off for the first few layers — with the Z-offset calibrated on the printer before you touch any of those. That order matters, and with PETG there is a second problem most other filaments don’t give you: it bonds to PEI hard enough to tear a divot out of the plate, so “stick” and “release cleanly” have to be solved together.
This guide gives the exact PETG first layer settings OrcaSlicer exposes, where each one lives, the mechanism behind it, and the one-change-at-a-time sequence to dial it in. Where the authoritative sources genuinely disagree — and with PETG bed temperature and first-layer offset, they do — it’s flagged so you can make the call for your plate.
Start here: Z-offset and bed level, before any slicer value
Z-offset is the dominant first-layer variable. It sets the precise gap between nozzle and bed on layer one, and almost every “my settings are wrong” first layer is really a squish or levelling problem wearing a costume. Calibration prints are mostly thin, wide, first-layer-dependent geometry, so on an untrammed bed they fail for reasons unrelated to whatever you think you’re testing.
OrcaSlicer has a Z-offset field under Printer presets > General, but treat it as a fine trim only. Do the real calibration on the printer first, then use Orca’s field for minor tweaks if your firmware allows slicer-defined Z-offset. Adjust in 0.02–0.05 mm steps; most total offsets land between −0.05 mm and −0.3 mm.
For PETG specifically, aim for 15–20% squish of layer height — and err on the side of slightly less squish than you’d use for PLA. Over-squishing PETG into PEI is exactly how you weld the part to the plate. If you want the full method, our first-layer calibration guide for OrcaSlicer walks the order end to end.
Nozzle temperature (first layer): 240 °C, then decide which way to offset
In OrcaSlicer the first-layer nozzle value is first_layer_temperature, set independently from the rest of the print. The Generic PETG profile ships at 240 °C, which is a sound everyday baseline, stepping to 235–245 °C for the remaining layers.
The contested part is which direction to offset layer one. Two documented schools exist, and both work:
- Higher first layer (wet the plate). Many makers run the first-layer nozzle 5–10 °C hotter than the rest so the plastic flows into the texture of the build plate and forms a stronger bond, then step down. Good when adhesion is marginal.
- Lower first layer (Prusa’s approach). Prusa documents 230 °C first layer, 240 °C after. The cooler extrusion is slightly less sticky — useful precisely because PETG grabs PEI too hard.
Pick based on your symptom. If the first layer looks overly squashed, wavy, or collects on the nozzle, drop the first-layer temperature by 5 °C and re-check Z-offset before changing anything else. If it won’t bond at all, add 5 °C. PETG is far more sensitive to under-temperature than over — poor adhesion is almost always a temperature problem first.
Bed temperature (first layer): 70–80 °C, lowest that holds
OrcaSlicer’s Generic PETG profile defaults the bed to 70 °C. The OrcaSlicer wiki quotes a working range of 70–85 °C and notes a higher bed temperature prevents lifting. Prusa documents 85 °C first layer dropping to 90 °C. Manufacturer data sheets span 65–90 °C.
Those numbers don’t all agree, and that’s not an error in any of them — Bambu’s Textured PEI spec lists PETG at 60–80 °C, Kingroon lists 70 °C for smooth PEI, and OrcaSlicer’s own material temperature table omits PETG entirely. Treat any single figure as a starting point, not gospel, and apply one rule: use the lowest bed temperature that still gives clean adhesion. A cooler plate is one of the cheapest ways to make PETG release without a fight.
If the first layer curls around the nozzle or separates during the skirt, raise the bed in 5 °C steps.
| Parameter | OrcaSlicer PETG start | Range | Notes |
|---|---|---|---|
| First-layer nozzle | 240 °C | 230–245 °C | Prusa runs 230 °C layer 1; +5–10 °C if adhesion is marginal |
| Other-layer nozzle | 235–245 °C | 220–250 °C | Wiki PETG nozzle range |
| First-layer bed | 70–80 °C | 65–90 °C | Lowest that holds; higher prevents lifting |
| First-layer height | 0.25 mm | 0.16–0.32 mm | 0.28–0.32 mm if sticking is poor |
| First-layer line width | 110–120% | 110–130% | 0.44–0.48 mm on a 0.4 nozzle |
| First-layer speed | 20–30 mm/s | 15–30 mm/s | Orca base default is 30 mm/s |
| First-layer fan | 0% | 0% | Off for the first 4–6 layers for PETG |
| First-layer flow ratio | 100% | 100–102% | Leave alone; fix Z first |
First-layer height and line width: the real adhesion levers
A thicker first layer is more forgiving — it bridges small bed imperfections and provides more melted plastic to bond. For a 0.4 mm nozzle, 0.25 mm is a reliable default; PETG that won’t stick responds well to going thicker, 0.28–0.32 mm. Don’t drop below 0.16 mm unless your bed is exceptionally flat.
Line width sits under Quality > Line width > Initial layer. Widening the first-layer line lays down more material and increases the contact patch with the bed — set it to 110–130% of nozzle diameter (0.44–0.52 mm on a 0.4 mm nozzle). Between height and width you’re giving layer one more volume and more footprint, which does far more for adhesion than fiddling with flow.
First-layer speed: slow it to 20–30 mm/s
OrcaSlicer’s base first-layer speed is 30 mm/s (60 mm/s for first-layer solid infill). For PETG, drop the perimeter and general first-layer speed to 20–30 mm/s, and down to 15–20 mm/s if it’s still misbehaving. A slower layer one builds adhesion and prevents lifting. Layer one decides whether the whole print succeeds; speed gains here are not worth the failures.
First-layer cooling: fan off
OrcaSlicer turns the fan off for the first layer by default. For PETG, go further: first-layer fan speed 0%, and keep the part-cooling fan off for the first 4–6 layers regardless. PETG needs warmth for layer adhesion; too much airflow early produces weak, poorly bonded layers. After those first layers, ramp the fan to roughly 30–50% — enough for overhang quality without starving the layer bond.
First-layer flow ratio: leave it at 100%
OrcaSlicer’s initial-layer flow ratio scales extrusion on layer one only and doesn’t affect brim or skirt. Some guides suggest nudging it to 102% to counter cold-start under-extrusion. The calibration-focused answer is to leave it at 100%: an inconsistent first layer is almost always a bed-levelling or Z-offset issue, not a flow one. Fix height and squish first. The exception worth knowing: Orca lets you raise flow on just the bottom layer, which Bambu Studio doesn’t — a useful lever for stubborn under-extrusion on textured PEI once Z and temperature are right.
The PETG-specific trap: it bonds to PEI too well
This is the part that catches people out. PETG grips PEI — especially bare smooth PEI — hard enough that force-removing a cooled part can rip a divot out of the coating. The fixes:
- Use a release agent as insurance. A glue stick or hairspray on PETG isn’t really for stiction — it acts as a release liner. It lets the part let go on cooling, and washes off with hot water after a few prints. Cheap insurance on any PEI plate for PETG.
- Textured PEI is Bambu’s documented default for PETG. Treat it as the default plate. A mildly uneven first layer with a 0.4 mm nozzle on textured PEI is normal, not a fault. Experiences genuinely differ — some report never needing glue on textured, others report ruined plates — which is exactly why glue is worth it even when you think you don’t need it.
- Don’t over-squish into the plate. A slightly higher Z-offset for PETG avoids bonding too hard. Combine it with a bed at the lower end (70–80 °C) and the part releases far more willingly.
- The glue-free alternative (trade-off). Some users run first-layer nozzle at 225–235 °C with faster first-layer speeds (60–80 mm/s) so PETG sticks on PEI but releases automatically on cooling. Note this directly contradicts the “slow layer one” advice above — it’s a deliberate trade-off, not a default. Try it if plate damage is your main concern and you’ve got adhesion to spare.
The tuning order — one change at a time
Don’t change everything at once. Work the sequence:
- Z-offset / first-layer calibration. Get the 15–20% squish right first.
- First-layer height and line width. More material, bigger contact patch (0.28–0.32 mm, 110–130%).
- First-layer speed. Slow it to 20–30 mm/s.
- Temperature. Add 5 °C to the nozzle, or 5 °C to the bed, if it still won’t bond.
- Brim or skirt. Add as insurance for warp-prone or small-footprint parts.
One more thing before you print: dry the filament. PETG is hygroscopic and wet filament causes stringing, poor surface and weak layers that look like a settings problem but aren’t. If a first layer still fails after this, photograph it and run it through our Diagnose tool for a concrete slicer change, or send the plate through the G-code pre-flight checklist before you commit to a long print. The whole point is that the software watches your back and catches the problem before it eats a spool.
The same levers behave similarly in Prusa’s slicer — if you’re cross-referencing, see our PETG first layer settings in PrusaSlicer guide.
FAQ
What first-layer temperature should PETG use in OrcaSlicer?
240 °C is the Generic PETG default and a solid baseline. If adhesion is marginal, run layer one 5–10 °C hotter than the rest to wet the plate; if PETG is grabbing the PEI too hard, follow Prusa and run it cooler at 230 °C. PETG is more sensitive to under-temperature than over, so when in doubt, add heat.
What bed temperature is best for PETG first layers?
Start at 70–80 °C and use the lowest temperature that still gives clean adhesion. Published figures range from 65–90 °C across manufacturers; a higher bed prevents lifting, but a cooler plate makes PETG release more easily — so tune to your plate, not to a single number.
Do I need glue for PETG on a PEI plate?
On textured PEI it’s cheap insurance; on bare smooth PEI it’s close to essential. Glue acts as a release liner, not just adhesion — PETG bonds to PEI hard enough to pull coating off. A slightly higher Z-offset and a cooler bed reduce the risk further. It washes off with hot water.
Should I change the first-layer flow ratio for PETG?
Leave it at 100%. Inconsistent first layers are a Z-offset or bed-levelling issue, not a flow problem. Fix squish, height and temperature first. If you still see under-extrusion on textured PEI, Orca lets you bump flow on just the bottom layer — use that only after everything else is right.
Running more than one printer in PETG?
If you’re printing PETG parts to sell or for a workshop, the first-layer recipe is only half the battle — repeatability across machines and knowing your true cost per part is the other half. Ask The Nozzle Printer Farm runs the whole job end to end: a web order from WooCommerce, Shopify or your own custom website (connected through the farm’s shop API) comes in, stock is used first, one click raises a works order for the shortfall, Cloud Slicer slices on your own PC through ATN Slicer, and the queue sends each job to the first free compatible printer with the right filament loaded. Cameras with AI failure alerts watch the print, good parts bank into stock with a real cost per part, and spools are deducted by the gram. It works with Creality and any Klipper/Moonraker printer, Bambu Lab in LAN mode, FlashForge, OctoPrint, PrusaLink and Duet — the small agent runs on a Windows or Linux machine that stays on, and your files stay on your own PC. There’s a free 14-day Workshop trial, no card.