Your true 3D print farm cost per part is not the filament bill. The formula that holds up at scale is simple to write and brutal to ignore:
Cost per part = (Material + Electricity + Machine wear + Labour) ÷ Success rate
Everything that wrecks a farm’s margins hides inside that one line. Filament is the number people quote, but across a realistic mix of parts it’s typically only 30–50% of the true cost — and on labour-heavy functional parts it can drop below 20%. The lines that actually decide whether you make money are labour and your failure rate, with machine utilisation sitting underneath both. This article walks through every component with real numbers, shows why batch economics change the maths entirely, and flags the arithmetic mistakes that quietly eat profit.
The four cost lines, with real figures
Build your model from the bottom up. Here’s what each line looks like in 2026, and roughly how big it is.
Material (30–50% of true cost, not 90%)
The base calculation is trivial: weight (g) ÷ 1000 × price per kg. The 2026 FDM filament market, per kilo:
| Material | Price per kg (USD, 2026) |
|---|---|
| PLA | $15–28 |
| ABS | $16–25 |
| PETG | $18–30 |
| TPU | $25–40 |
| Carbon fibre / nylon / PC blends | $35–80 |
| Exotics (PEEK, high-temp CF) | $200+ |
Two uplifts you must add or your model lies to you. Support and waste: geometry and support settings can add 10–30% to actual material used; a flat 10% waste multiplier is a sane default. Multi-colour purge: AMS-style filament switching adds anywhere from 10% to 40% material depending on how many swaps a plate needs. That purge is pure scrap — design plates to minimise colour changes per layer.
Electricity (almost always the smallest line)
Per-hour: printer wattage × hours × tariff. A typical hobby FDM machine draws 50–300 W, averaging 0.1–0.2 kWh per hour. Measured Bambu figures put an A1 at roughly 90 W (about 0.09 kWh/h) printing PLA. Chamber heating changes everything — an X1C/P1S sits near 110 W on PLA but climbs to around 350 W with the chamber heated for ABS or ASA.
In cost terms this is near-noise on a single part: about 2 US cents or 3 euro cents per print-hour. At UK tariffs of roughly £0.245–£0.34/kWh an 0.1 kWh/h machine costs around 2.5–3.4p an hour. The caveat: at farm scale, electricity stops being trivial. Twenty machines running 16 hours a day turns that line into a real monthly overhead, and long ABS prints on night tariffs are worth scheduling deliberately.
Machine wear / depreciation
Divide purchase price by estimated lifetime hours. The lifetime-hours assumption is the contested bit — sources use anything from 2,000 to 10,000 hours, and commercial calculators often take a conservative 3,000. Worked benchmarks per print-hour:
| Machine class | Price | Depreciation per hour |
|---|---|---|
| Entry FDM | $250 | $0.075 |
| Mid-range FDM | $600 | $0.110 |
| Prosumer FDM | $1,200 | $0.157 |
Bambu’s own commercial figures, assuming a 3,000-hour life, come out at $0.23/hr for a standalone machine or $0.28/hr with an AMS Combo, plus about $0.06/hr for scheduled maintenance and spares — a baseline of roughly $0.31–$0.36 per printing hour before filament. Amortised consumables (nozzles, plates, PTFE, belts) add little: around $80/year over 2,000 hours is about $0.04/hour.
Labour — the line that actually decides profitability
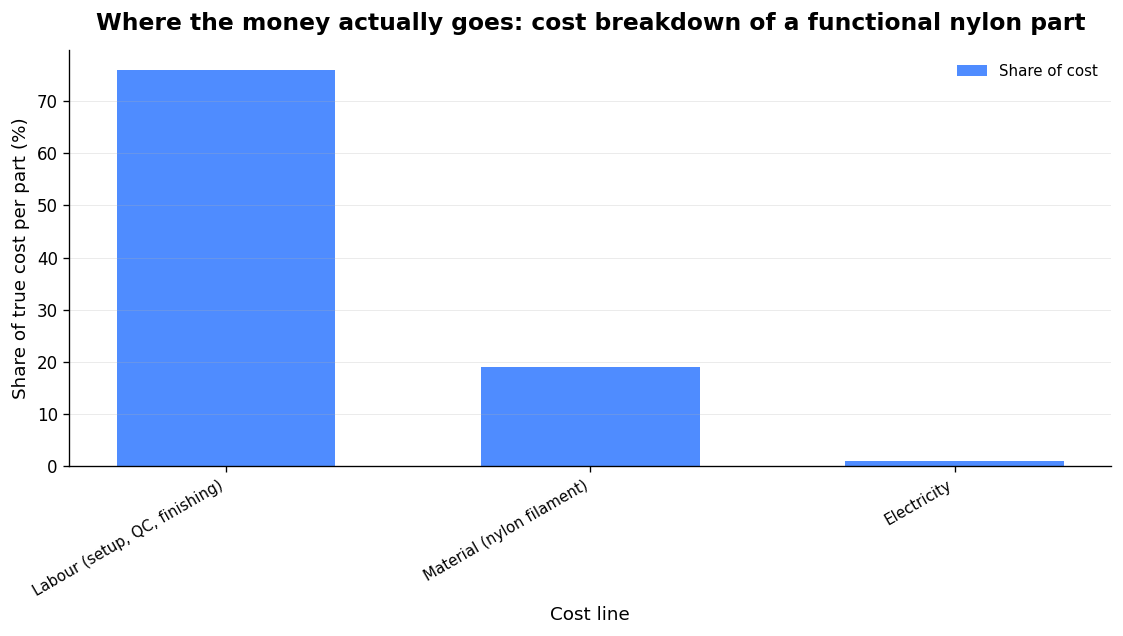
This is the one most people leave out, and it’s usually the largest. A worked functional nylon part breaks down as material $2.50 (~19%), electricity $0.15 (~1%) and labour — setup, monitoring, QC, post-processing — $10.00 (~76%). That exact split isn’t universal, but the shape is: on anything beyond a bare PLA trinket, labour dominates.
Typical touch time is 5–15 minutes per print at £12–15/hr for setup, bed clearing, QC and packing. And here’s the counter-intuitive farm trap: faster machines create more labour, not less. Higher print speeds linearly increase the number of jobs per day, and every job is a touchpoint. Even at one minute per step, a 20-printer farm running 4-hour prints burns over 5 hours a day of labour (20 printers × 6 prints × ~4 minutes). The operators who run the most machines per person treat bed clearing as the first thing to automate, not the last.
Why batch economics change everything
The whole economic case for a print farm over a single printer lives in the fixed per-order costs — setup and packing — spread across a batch. Filament, electricity and depreciation are per-unit and don’t move. Setup and packing are per-order and collapse when you batch:
| Cost line | Single unit | Batch of 10 (per unit) |
|---|---|---|
| Setup labour (level, load, slicer check) | £5.00 | £0.50 |
| Pack labour | £2.00 | £0.80 |
| Filament + electricity + depreciation | constant | constant |
| Total per unit | £9.56 | £3.86 |
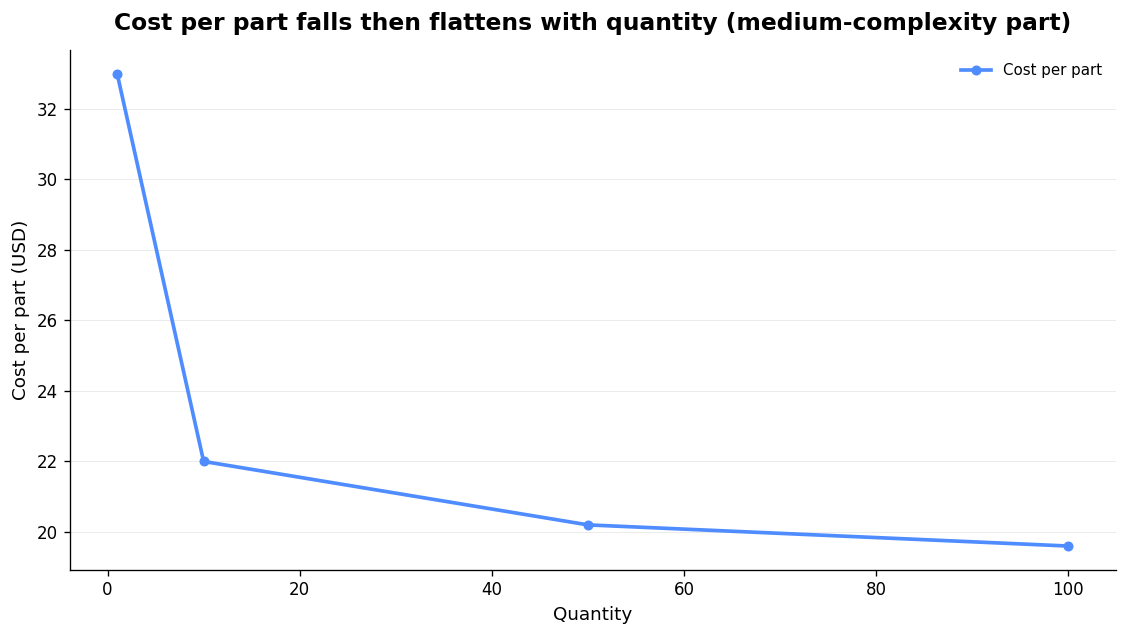
Batch runs cut per-unit labour by 60–80%. Across quantity, unit cost falls then flattens — a medium-complexity part might run $33 at one unit, $22 at ten, $20.20 at fifty and $19.60 at a hundred. Because additive has zero tooling cost, the curve stays virtually flat from part 1 to part 10,000, unlike injection moulding. Nesting matters too: taking parts-per-bed from 1 to 3 triples weekly output (280 → 840 prints) for the same number of setups. Realistic FDM batch throughput multipliers land around 5–10×. (Note that FDM tracks part volume and prints largely one plate at a time — true batch processes like SLS/MJF instead reward packing density, where lifting a build from 6% to 12% roughly doubles output and halves machine amortisation per part.)
Failure rate: the silent margin killer — and the maths people get wrong
Scrap is where honest cost models separate from wishful ones, and the arithmetic trips up nearly everyone. You divide by the success rate — you do not multiply by the failure rate.
At a 20% failure rate the correct uplift is 25%, not 20% (divide by 0.8). At a 50% failure rate your true cost doubles — multiplying by 1.5 recovers only three-quarters of what you lost.
Plan for 5–10% on a well-tuned farm; around 10% is a sensible assumption for a small mixed fleet, varying by material, machine and model complexity. A 14-hour print that fails at hour 13 is not free — it cost a full plate of filament plus machine time you can’t resell. One subtlety: don’t gross up labour by the failure rate. You slice and finish each good part once, however many attempts the printer took, so the failure line applies to material, electricity and machine wear, not to your hands-on time.
This is also the single biggest lever you control. Catching a warp or a first-layer problem before committing a long run is the difference between a 5% and a 15% scrap rate. A pre-flight pass on the G-code — our pre-flight G-code checker runs a 40+ rule engine over a file before it ever hits a bed — and camera-based AI failure detection that pulls a job early both feed straight into that success-rate denominator. If you want the diagnosis side, the difference between live detection and root-cause diagnosis is worth understanding before you rely on either.
Utilisation is the number that actually pays the bills
A farm earns on machine hours. A printer running 16–20 hours a day at a low scrap rate is profitable; the same machine idle half the day is a depreciating asset consuming floor space and standby power. A common operator target: $2 per print-hour per machine at a 30% gross margin, optimising for print hours as the limiting factor.
Machine count is a poor proxy for output. Someone running 300 identical machines making one item has a completely different job from someone overseeing 100 machines on mixed files and colours. The constraint is rarely the printers — it’s how many touchpoints a person can absorb before jobs sit idle waiting for a clear bed. That’s a queueing and scheduling problem as much as a hardware one; see our guide to running one backlog across a whole fleet.
From cost to price
Once your cost is honest, pricing is a decision, not a guess. The standard structure:
Sell price = (Material + Energy + Depreciation) × markup multiplier + Labour
Farm margin targets typically sit at a 2.5–3× multiplier, and a 50% margin is achievable for made-to-order goods when the cost model is honest and the failure rate is low. If you sell on a marketplace, price in the commission — Etsy and eBay charge on item plus shipping, so that fee is a real cost line, not an afterthought.
Sanity-check benchmarks
Real per-part costs span roughly $0.55 to $16 depending on size, material and labour. A few reference points to check your model against:
- Small PLA print (40 g, 3 h, Bambu A1): ~$1.05–$1.10 all-in — about $0.80 filament, $0.05 electricity, $0.24 depreciation.
- 100 g, 6-h PLA on a $399 P1S: $8.58 with labour costed — or $3.08 if your time is free. That gap is the whole story.
- Bulk FDM farm pricing to customers (2026): small enclosures run $2–5 via an FDM farm, versus $25–40 from an SLS bureau or $0.50–1.50 injection moulded at volume. At farm scale small PLA parts land at $1–6 each (~$0.12/g all-in).
Where this gets automated end to end
You can model all of this in a spreadsheet, but the costing only stays true if the farm actually records it as prints run. Printer Farm is built to run the job from order to despatch: a web order from WooCommerce, Shopify or your own custom website (connected through the farm’s shop API — a token, no plugin) matches to a part by SKU, stock is used first, and one click raises a works order for exactly the shortfall. The queue dispatches each job to the first free compatible printer with the right filament loaded, cameras with AI alerts watch it, and good prints bank into stock with spool grams deducted and a true cost per part recorded — mixed plates split by weight — ending in a numbered delivery note at despatch. It works across Creality and any Klipper/Moonraker printer, Bambu Lab in LAN mode, FlashForge, OctoPrint, PrusaLink and Duet. It needs a small agent on a Windows or Linux computer that stays on; your files stay on your own machine and slicing runs on your PC through ATN Slicer (or on our servers on Workshop and above). There’s a free 14-day trial, no card. If you’re selling on marketplaces specifically, the Etsy seller workflow walks through the same pipeline.
FAQ
What is a realistic 3D print farm cost per part?
Across typical FDM work, real all-in costs run from about $0.55 to $16 per part. Small PLA parts at farm scale land around $1–6 each (~$0.12/g all-in). The spread is driven almost entirely by labour and part size, not filament price — so model all four cost lines plus your success rate rather than quoting the material cost.
How do I account for failed prints in my cost per part?
Divide your production cost by (1 − failure rate), never multiply by the failure rate. At 20% failures the correct uplift is 25% (÷ 0.8), not 20%. Leave labour out of the failure line — you finish each good part once regardless of how many attempts the printer needed.
Why is material not the biggest cost in a print farm?
Because filament is cheap per gram and labour is not. Setup, monitoring, bed clearing, QC and packing typically run 5–15 minutes per print at £12–15/hr, which on most parts outweighs filament several times over. Material is usually 30–50% of true cost, and under 20% on labour-heavy functional parts.
Does batching actually lower cost per part?
Yes — it spreads fixed per-order costs (setup and packing) across more units while per-unit costs stay constant. Batching cuts per-unit labour by 60–80%; a part costing £9.56 as a single unit can fall to £3.86 in a batch of ten. Nesting more parts per plate multiplies output for the same number of setups.
Related: Vision AI for 3D Printing: How It Catches Failures, Where It Misses, and How to Set It Up